Product Support

Get help with products

Stuck on how to use one of our products?
Not sure how to clean them?
Find all the useful support information right here.
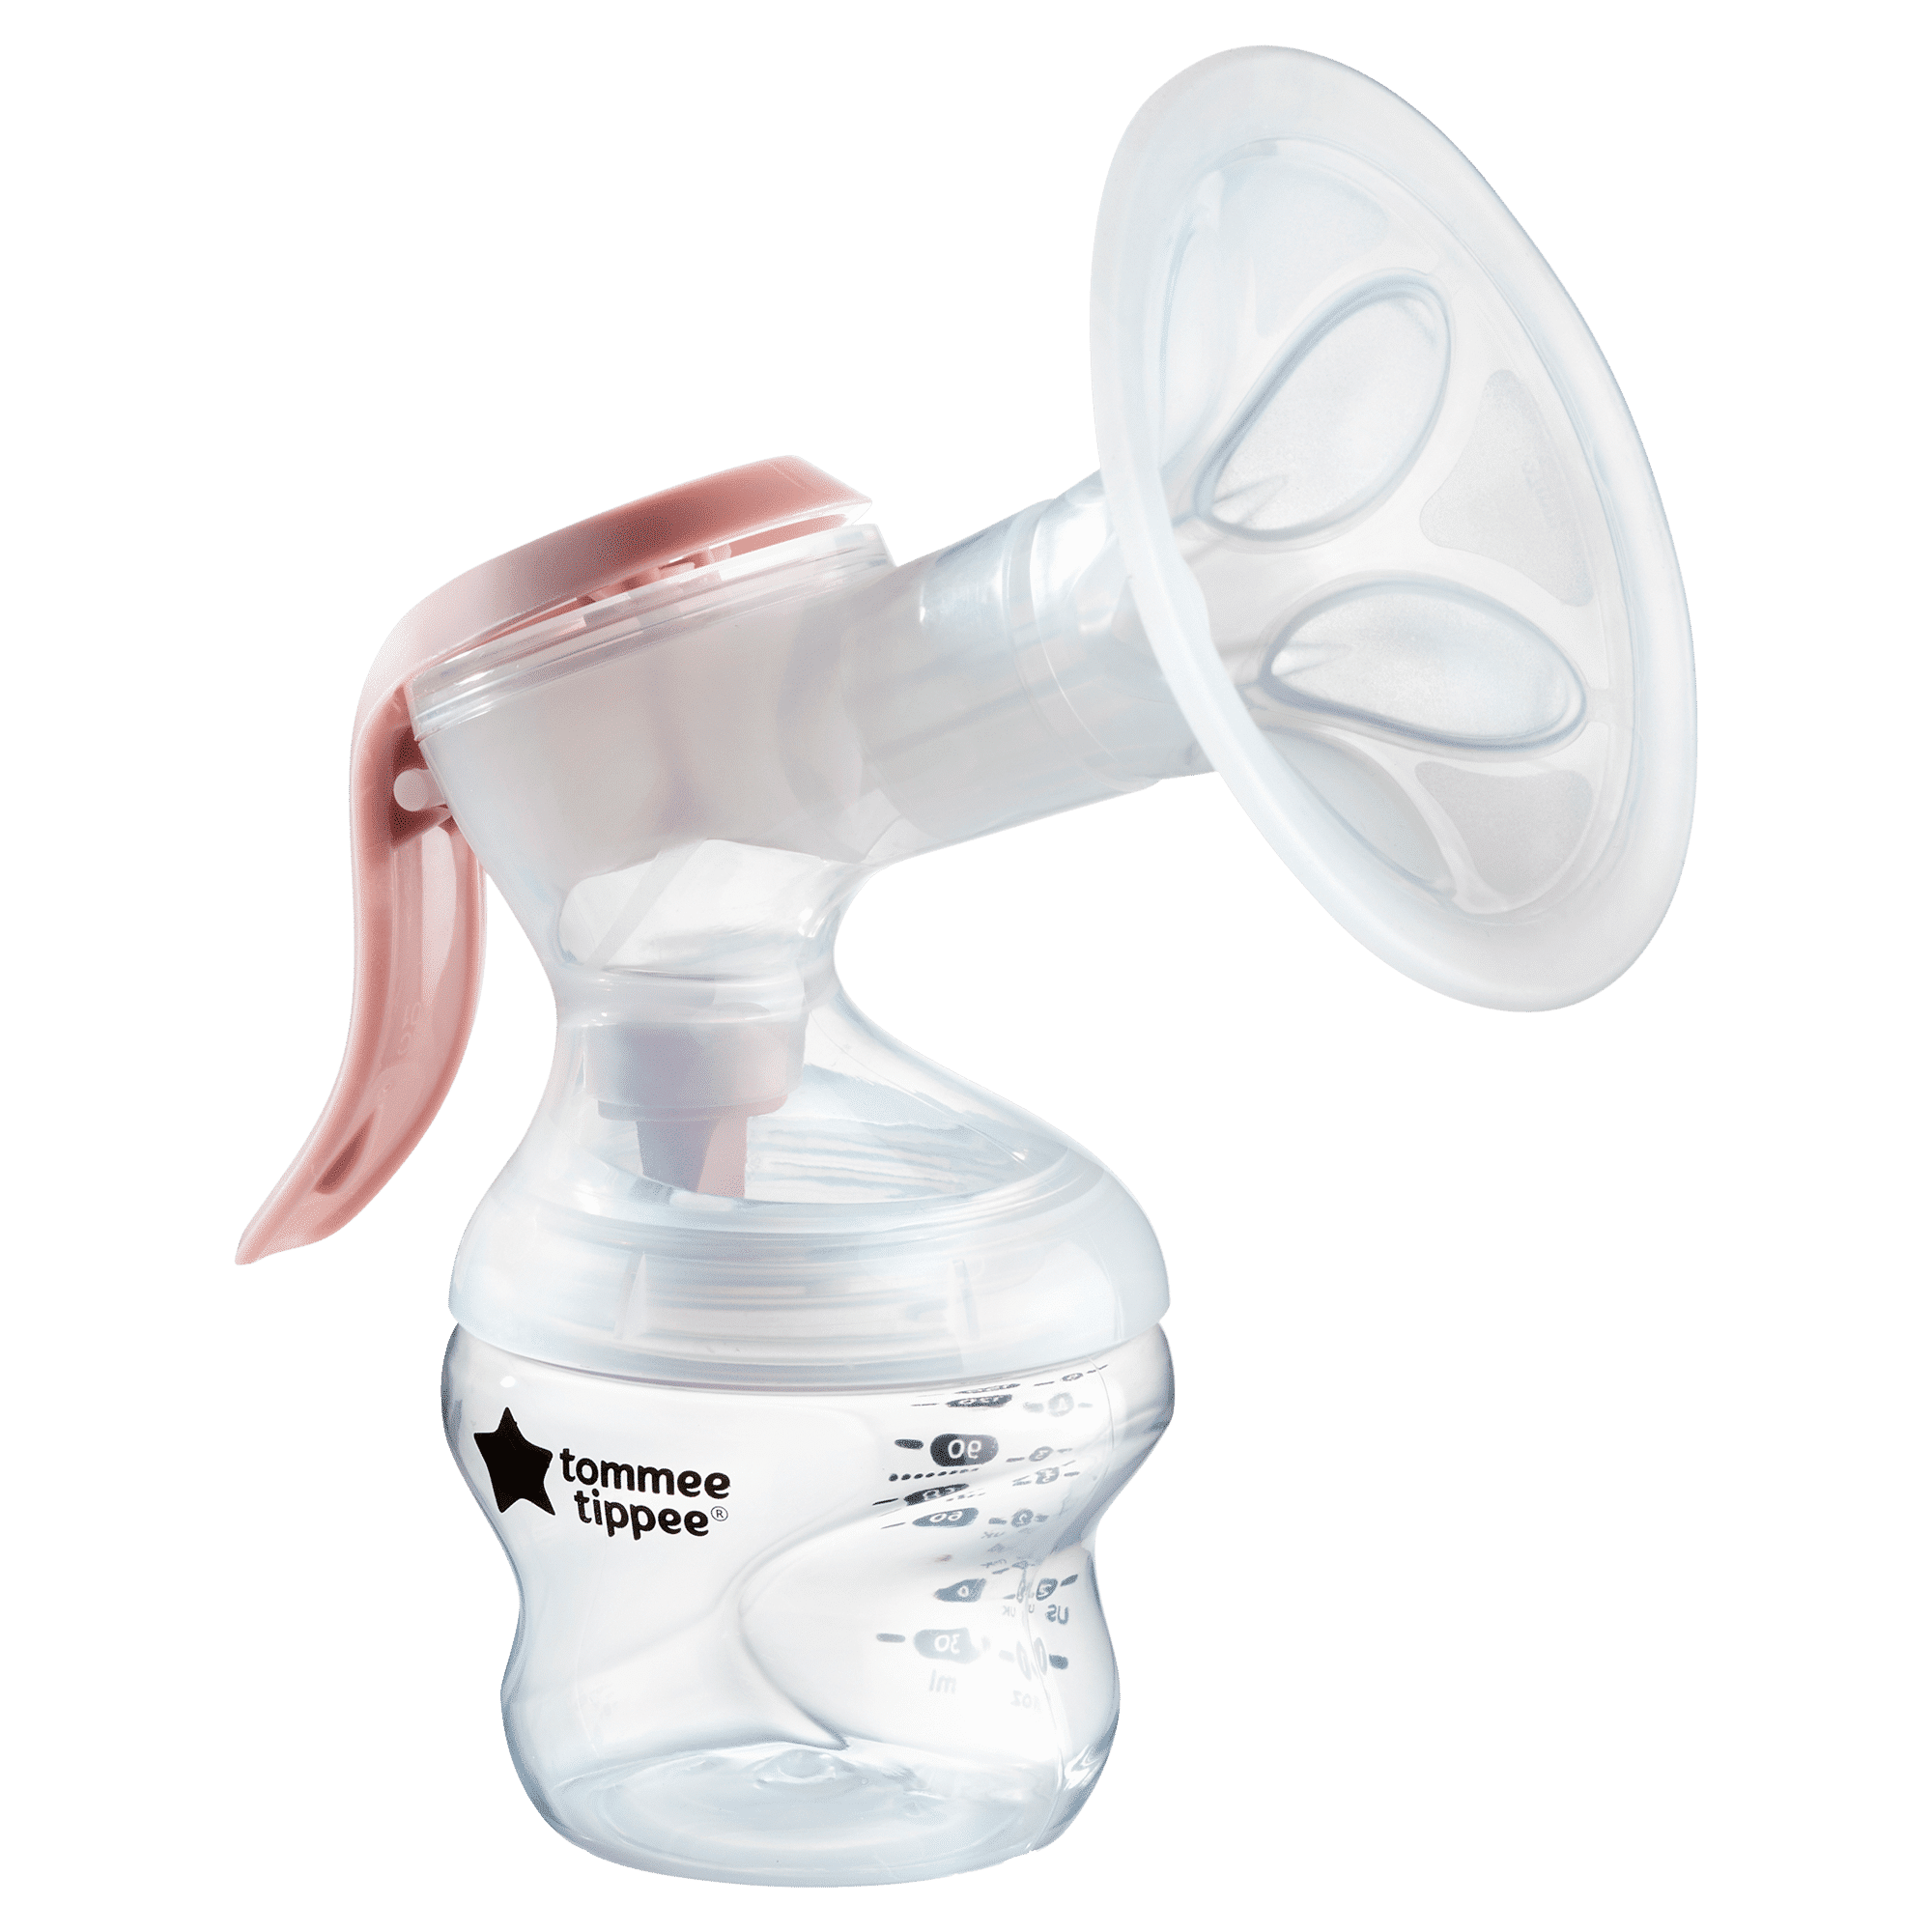
Made for Me Single Manual Breast Pump


Made for Me Single Manual Breast Pump

Getting Started

Thanks for purchasing a Tommee Tippee Manual Breast Pump!

This manual breast pump is the simple and comfortable way to express your breast milk. With a narrow neck and curved handle, it helps to maximise the power of your pumping action while reducing the strain on your hand as you express your breast milk.

This page is here to help you get the most out of your breast pump, and to answer any questions you may have. Keep on reading for product support and troubleshooting advice.

Parts Guide
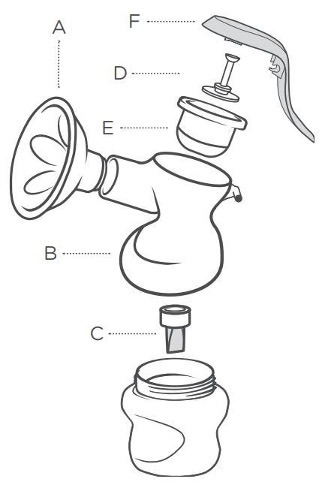
manual breast pump parts guide Horn, Body, Duck-bill valve, connector, Diaphragm, Handle & Cap

  1. Horn - trumpet shaped part with a soft edge to sit comfortably against your breast and petals for massaging to stimulate more milk flow.
  2. Body – duck-shaped part that connects the horn and cup to your bottle and attaches to the handle.
  3. Duck-bill valve (peach) – small one-way valve that lets breast milk into your bottle, but doesn’t let it back through.
  4. Connector – rod shaped piece that connects the handle to the diaphragm.
  5. Diaphragm – small, transparent cup-shaped part that creates the pump pressure.
  6. Handle and cap (peach) – The curved handle that you use to pump. This snaps onto to the body and diaphragm via the connector.

Getting Started

Before you use your pump for the first time and after every use…

  • Wash your hands with soap and water and dry thoroughly before handling your breast pump.
  • Thoroughly clean and sterilise all the parts of your breast pump following the instructions below.

How to clean your Manual Breast Pump

  1. Unscrew the bottle from the pump body.
  2. Pull the horn away from the pump body and remove the duck-billed valve.
  3. Disconnect the handle from the body by pulling away from the body horizontally.
  4. Lift out the diaphragm from the body.
  5. Pull out the connector rod from the diaphragm.
  6. Wash all parts in clean soapy water. Don’t use water that you’ve used for cleaning other products.
  7. Rinse thoroughly with clean water.
  8. You can also wash the pump components in the top rack of a dishwasher. Place the peach duck-bill valve in the cutlery rack or dishwasher pod to help keep it safe.
  9. Sterilise all parts of the pump using either cold water sterilisation, microwave sterilisation, boiling water, or electric steam sterilisation.
  10. For best results use Tommee Tippee® electric or microwave sterilisers.

Assembling your Manual Breast Pump

Each time you use your breast pump, check all parts of the pump for any damage, and always wash your hands with soap and water and dry thoroughly before handling your breast pump.
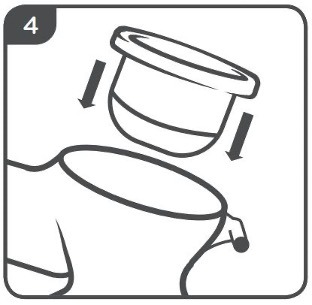
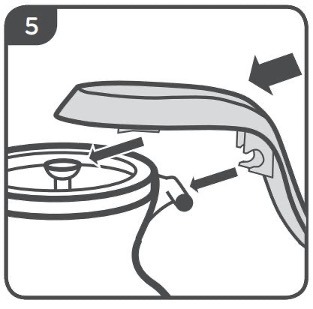
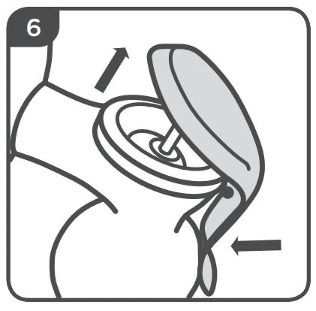
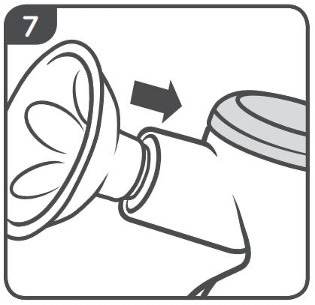
manual breast pump how to assemble steps 1 through to 9 as listed below

manual breast pump how to assemble steps 1 through to 9 as listed below

manual breast pump how to assemble steps 1 through to 9 as listed below

manual breast pump how to assemble steps 1 through to 9 as listed below

manual breast pump how to assemble steps 1 through to 9 as listed below

manual breast pump how to assemble steps 1 through to 9 as listed below

manual breast pump how to assemble steps 1 through to 9 as listed below

manual breast pump how to assemble steps 1 through to 9 as listed below

  1. Make sure that all parts of the pump have been washed and sterilised.
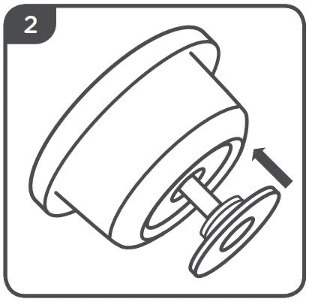
  2. Push the connector rod through the bottom of the diaphragm.
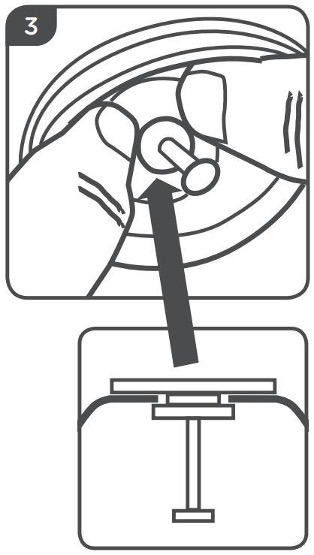
  3. With two hands gently squeeze the bottom of the diaphragm over the ring in the base of the connector rod. The rod should be securely held by the diaphragm.
  4. Place the diaphragm in the top of the pump body and push the diaphragm edge down around the whole circumference of the pump body to make a good seal.
  5. Pick up the pump body and, from the side, slide the handle onto the body, so that the clips on the top slide onto the top of the connecting rod, and the two clips at the side snap onto the back of the pump body.
  6. The handle should now freely move up and down and you should see the diaphragm lift up when you press the handle down.
  7. Push the horn onto the body until it’s engaged and secure. Turn your pump upside down.
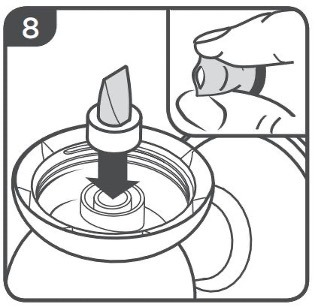
  8. Insert the duck-bill valve. Gently squeeze the sides of the valve to make sure it opens.
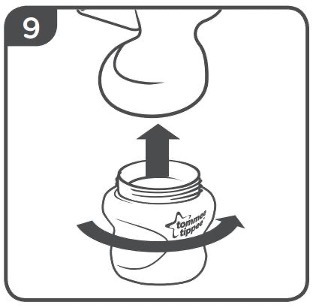
  9. Screw in a Tommee Tippee Closer to Nature or Advanced Anti-Colic bottle. This breast pump is designed to fit all Tommee Tippee Closer to Nature and Advanced Anti-Colic bottles and Express & Go / Pump & Go milk pouches with adaptor rings (excludes Tommee Tippee Closer to Nature Glass bottles).
  10. Place the assembled pump on a flat surface.


How to Use

How to use your Manual Breast Pump


The best time to use your breast pump is after the first feed of the day (unless your breastfeeding advisor has told you something different).

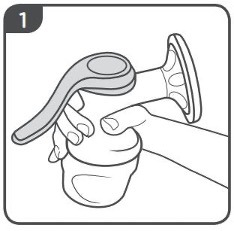
Get yourself in a comfortable position, sitting, standing or half-lying. The important thing is to keep the pump handset vertical while you hold it against your breast. You’ll also need a flat surface nearby to put the pump and bottle on when you’re done.
steps 1 and 2 showing breast pump held up right and placed on breast

steps 1 and 2 showing breast pump held up right and placed on breast

  1. Hold the pump handset around the narrow neck of the body. Hold it in whichever hand feels most comfortable. As you use it, you may find it’s more comfortable to cup your hand around the bottle.
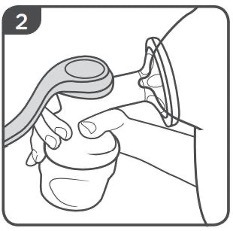
  2. Place the horn over your breast so that it creates a seal all the way around with your nipple at the centre of the hole. You don’t need to cover the whole of your areola or breast with the horn, so don’t force it. It should sit comfortably. If it doesn’t feel right, relax and reposition.
  3. Gently squeeze the handle and you’ll feel the suction.
  4. Release the handle and allow it to return to its resting position. Releasing the handle opens the valve so your milk can flow into the bottle.
  5. Try to imitate the rhythm of your baby as they suck. You don’t have to squeeze hard – just as much as is comfortable for you.
  6. When you first start expressing milk, use the pump for 3-5 minutes on each breast. Over time you will be able to build up to 10-15 minutes on each breast.
  7. You can help stimulate your milk flow by gently stroking and massaging your breast.
  8. The amount of milk you express and the time it takes will vary. Don’t worry, this is normal.
  9. If air is getting in around the horn, your pump may not suck milk effectively. Adjust your position and replace the cup on your breast so that it feels comfortable and the pump is expressing milk.

When you want to stop expressing…

  • When your milk is no longer freely flowing, stop pumping.
  • You can store your breast milk in the bottle, by adding a clean sterilised lid or teat and hood, or use it to feed it to your baby.
  • When you’ve finished using the pump, disassemble all the parts and clean it. You do not need to sterilise it until you’re ready to use it again.

Please note…

  • If using this breast pump is more painful than when you breast feed, stop using it immediately.
  • The horn should feel comfortable against your breast. If it doesn’t, you may need a different size.
  • When pumping your nipple should sit comfortably in the centre of the horn and will be extended down the tube by gentle suction.
  • The pump creates a seal around your areola and nipple. You do not need to cover the whole of your areola or breast with the horn.
  • Do not force your breast or nipple into the horn.
  • Don’t tilt the bottle while expressing. Keep it upright to keep your milk flowing into the bottle.
  • You don’t need strong suction to express milk from just behind your nipple.

How to store expressed breast milk

Breast milk can be stored using the following guidelines…

 Method of Storing Breast Milk

Use Within 

Remember...

Room temperature <25°C

6 Hours

  • Never defrost or heat breast milk in a microwave.
  • Never re-freeze breast milk.
  • Milk stored in the fridge but intended for freezing should be frozen within 24 hours.
  • Once defrosted, the breast milk should be kept in the fridge and used within 12 hours.
  • Do not boil breast milk.
  • Throw away any leftover breast milk after freezing.

Refrigerated at 5-10°C

3 Days

Refrigerated at 0-4°C

6 Days

Frozen

6 Months

Please note, this table aims to provide a guide to how long you can store breastmilk for a full term baby with no additional health concerns.

  • When you want to freeze breast milk, allow space at the top of your bottle for it to expand. It’s easiest to freeze breast milk in individual feed quantities of 60-125ml/2-4oz.
  • Your breast milk may separate out into layers when you store it. Give it a shake to remix it thoroughly before feeding your baby.
  • Thaw frozen breast milk in the fridge or by standing your bottle in lukewarm water until it has reached body temperature. Or use a Tommee Tippee bottle warmer.
  • If you want to take expressed breast milk out and about with you, make sure it stays cold or frozen until you need to feed your baby.


FAQs

Manual Breast Pump FAQs

Help – there’s no or very little suction. What can I do?

It’s most likely that there’s some air getting in somewhere, which means the pump won’t work properly.

  • Make sure that the horn forms a comfortable seal around your breast. Adjust your position if you need to.
  • Check that the diaphragm cup is sitting on the top of the pump body. Make sure it’s been pushed down all the way around the top of the circumference to make a good seal.
  • Check that the connector rod is sitting properly in the diaphragm cup. The rod should be pushed through so that the big part sits under, and the small part sits above the base of the diaphragm.
  • Check that there are no tears on the diaphragm cup.
  • Check the valve is clean and opens easily. Give it a gentle squeeze if it’s stuck.

Why do I have to use a Tommee Tippee bottle?

The Tommee Tippee® Made for Me manual breast pump is designed to be a perfect fit for Tommee Tippee bottles and pouches (excludes Tommee Tippee Closer to Nature® Glass bottles). You may get leaks and spills if you use other brands of bottles and containers that don’t fit correctly